Sections
Related Tutorials
- Setting Up a Warehouse
Overview
The Warehouse Setup section is where you are able to create and manage Warehouses for your Enterprise. You can set Default Locations here, and generate Global Sequences for Allocation, Picking, and Putaway.
From here you can...
Main Screen Layout
The Warehouse Setup section is divided into two areas: the Warehouse List and the Warehouse Editor.
1. Warehouse List
A list of all Warehouses in the system.
2. Warehouse Editor
Where you create a new or manage an existing Warehouse.
Warehouse List
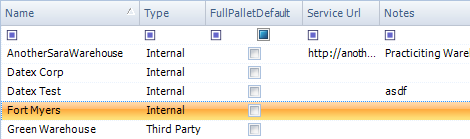
Name: The Warehouse Name.
Type: The Type of Warehouse (Internal or Third Party).
Fill Pallet Default: If there is a check mark in the box, the Warehouse is set to default to Pick full pallets rather than from shared Pallets in higher priority Pick Locations.
Service URL: A web address associated with the Warehouse.
Notes: Any notes in the system for the Warehouse.
Warehouse Editor
You can create a new Warehouse by clicking the New button, or you can edit an existing Warehouse by highlighting it and clicking the Edit button. Once you've finished, click the Save button. The Cancel button will cancel whatever changes you have made.
| Name: | The Name of the Warehouse. |
| Type: | A drop-down menu, from which you will select the Warehouse Type. An Internal Warehouse is a Warehouse you will be actively operating, whereas a Third Party Warehouse is a Warehouse that you would like to keep track of, but not actually run. The system will maintain information on the Third Party Warehouse's inventory, based on Inbound or Outbound Shipments from your Internal Warehouses. |
| Enterprise: | The Enterprise that owns the Warehouse. Typically you will only have one option. |
| Service URL: | An open field for a web address associated with the Warehouse. |
| Full Pallet Default: | If selected, the Warehouse is set to default to Pick full pallets rather than from shared Pallets in higher priority Pick Locations. |
*Those in red are required fields.
Setting Default Locations does not restrict you to using these Locations, but when prompting for one of these Locations, the field will automatically be populated by the default.
| Default ASN Receiving Location: | The Default Location for Receiving Advance Shipping Notice Orders. |
| Default Finished Product Location: | The Default Location for Materials that result from Manufacturing. |
| Default Manufacturing Location: | The Default Location for completing Manufacturing Orders. |
| Default Pick Destination Location: | The Default Location for where Picked Materials should go before Shipment. |
| Default Mobile Receiving Search Options: | This determines the field in which the cursor will be focused when opening the Receiving, ASN Receiving, and Barcode Receiving sections on the Mobile Device, including options for Door (default), Order, and Shipment. |
An open field in which you can input whatever notes or extra information you would like. The notes are saved, but otherwise have no effect on anything in the system.
There are four buttons at the bottom of the Warehouse Details tab. The first button, View Warehouse Layout, opens the Warehouse Explorer for the selected Warehouse (see the Warehouse Explorer guide). The Warehouse Explorer is where you add Locations toy our Warehouse.
The other three buttons are for Generating Global Allocation, Pick, or Putaway Sequences. Clicking these buttons instructs the system to review the Warehouse's Locations, and assign a Sequence number to each Location for whichever Task you chose. the system will then default to this Sequence when making Suggestions or Recommendations for Allocation, Picking, or Putaway. These sequences can be overridden by going to individual Locations and changing the individual values.
Note
Generating Global Sequences may take time depending on how many Locations you have set up in your Warehouse.
The Contacts tab is further divided into two parts: the Contact List and the Contact Details Editor.
A list of all Contacts associated with the selected item.
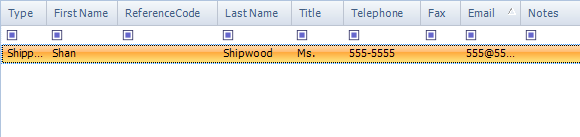
| Type: | The Contact Type. |
| First Name: | The First Name of the Contact. |
| Reference Code: | The LookUp Code for the Contact, for your own Reference. |
| Last Name: | The Contact's Last Name. |
| Title: | The Contact's Title. |
| Telephone: | The Contact's telephone number. |
| Fax: | The Contact's facsimile machine communications code. |
| Email: | The Contact's e-mail address. |
| Notes: | Any Notes in the system about the Contact. |
You can create a new Contact by clicking the New button, or you can edit an existing Contact by highlighting them and clicking the Edit button. Once you've finished, click the Save button.
The Contact must have a Name specified.

| LookUp Code: | A LookUp Code for the Contact, for your own Reference. |
| First Name: | The Contact's First Name. |
| Middle Name: | The Contact's Middle Name. For thoroughness. |
| Last Name: | The Contact's Last Name. |
| Contact Type: | A drop-down list of Contact Types: Billing, Commercial, Operations, Residential, and Shipping. |
| Title: | The Contact's Title. |
| Greeting: | A Greeting for the Contact. |
*At least ONE field in red is required.

| Phone 1: | The first Phone number for the Contact. |
| Phone 2: | A secondary Phone number for the Contact. |
| Fax 1: | The first Fax number for the Contact. |
| Fax 2: | A secondary Fax number for the Contact. |
| Email 1: | The first e-mail address for the Contact. |
| Email 2: | A secondary e-mail address for the Contact. |
| URL: | A web address for the Contact. |

| Attention: | The Attention Line for the Contact. |
| Line 1: | The first Address Line for the Contact. |
| Line 2: | The second Address Line for the Contact. |
| City: | The Contact's City. |
| State: | The Contact's State. |
| Zip: | The Contact's ZIP Code. |
| Country: | The Contact's Country. |
An open field in which you can input whatever notes or extra information you would like. The notes are saved, but otherwise have no effect on anything in the system.
Any fields you have set up for this section will appear here. For more information, see the User Defined Fields section.
Only Footprint Users with a check mark in the Allow box next to their User Name will be able to work with this area.
Note
By default, Users have no check in either Allow or Deny, effectively denying them access.
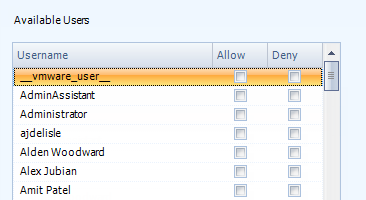
| Username: | The Footprint User's username. |
| Allow: | Put a check mark in this box by clicking it to give the User access to this area. |
| Deny: | Put a check mark in this box by clicking it to prevent the User from accessing this area. |
| Last Updated: |
| 06/06/2025 |
Copyright © 2025 Datex Corporation